#learndash #wordpress #lmssoftware
AI Create Index 30 (3 = AI was used in the research for the content, and some of the points were written by AI O = AI was not used in generation of the graphics) THIS IS 70% ORIGINAL CONTENT.
After designing your course structure, the next key step in building a successful LearnDash platform is customizing the look and feel of your LMS to reflect your brand and enhance the overall user experience. Customization not only creates a visually appealing and cohesive design but also improves navigation and usability for learners.
In this article, we’ll explore how to customize LearnDash by choosing the right WordPress themes, integrating page builders like Elementor or NicePage, and ensuring your design is consistent across all devices
Choosing a theme and page builder
It is important to recognize there are two very different scenarios for implementing LearnDash:
- You are setting up a new WordPress site specifically for the purpose of loading the LearnDash LMS.
- You have an existing WordPress website to which you now need to load the LearnDash plug-in.
Creating a new site for loading LearnDash
If you’re building a brand-new WordPress site specifically for LearnDash, you have the advantage of starting with a clean slate. This allows you to choose a theme that is perfectly tailored to the needs of your LMS platform without worrying about legacy content or design constraints. Here are some key considerations when selecting a theme for your LearnDash site:
LearnDash Compatibility: Your first priority should be to choose a theme that is fully compatible with LearnDash. While many WordPress themes can (technically) support LearnDash, selecting a theme specifically designed or optimized for LMS functionality will save you time and ensure better integration. Look for themes that:
- Offer built-in styling for LearnDash course pages, lessons, and quizzes, so you don’t need to customize every element from scratch.
- Provide a clean and professional layout for course listings, student dashboards, and navigation menus.
- Support LearnDash-specific features like Focus Mode and course grids without the need for extra customization.
Popular themes designed for LearnDash include:
- Astra: Lightweight and highly customizable, Astra is a top choice for LearnDash users. It integrates seamlessly with LearnDash and popular page builders, making it a versatile option for both beginners and advanced users.
- BuddyBoss: If you want to build a more community-driven LMS, BuddyBoss is definitely an option. It integrates well with LearnDash and includes features for social networking, forums, and member management.
- Kadence: A fast and flexible option, Kadence offers deep LearnDash integration with custom layouts and styles that are designed specifically for online courses.
Adding LearnDash to an Existing WordPress Site? - Read This First
If you’re integrating LearnDash into an existing WordPress site, it’s important to avoid common pitfalls — especially when it comes to themes and templates.
Most Important Tip:
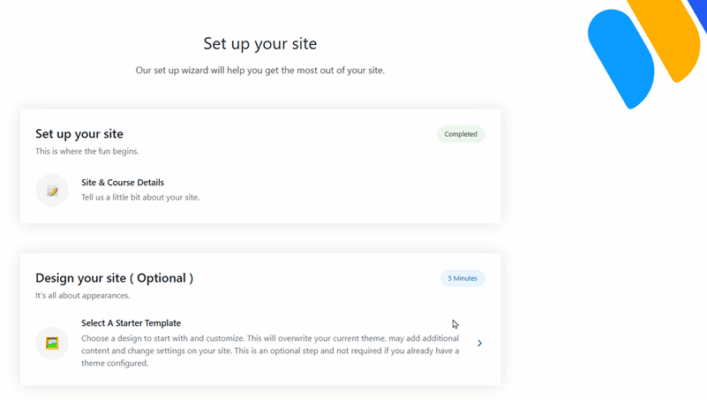
If you are loading LearnDash on an existing site, do NOT select a theme during the LearnDash setup wizard.
This step is optional — and if accepted, it can overwrite your current theme settings, potentially disrupting your site’s design, layout, and page builder configurations.
This action may:
- Replace your active theme (e.g., with Astra or Kadence).
- Reset global typography, spacing, and navigation menus.
- Conflict with your existing page builder setup.

Better Approach: Use Your Existing Theme + a Page Builder
If your current theme is working well and supports full-width pages or LMS-style layouts, there’s no need to switch. Instead, use a page builder to design custom templates for your LearnDash content:
Popular Page Builders with LearnDash Support:
- Elementor – Offers deep LearnDash integration (especially in Pro), including dynamic content widgets for course grids, lesson lists, user dashboards, and progress indicators.
- Beaver Builder – Also compatible with LearnDash via shortcodes or third-party modules like Beaver Themer, which can be used to style LearnDash content dynamically.
Tools like Elementor and Beaver Builder give you full control over the visual presentation of your LearnDash content without needing to switch themes or dive into code. With these page builders, you can design fully branded, mobile-friendly course pages that align with your existing site design. They allow you to create reusable layouts for lessons, topics, and quizzes, helping you maintain visual consistency and streamline the course-building process.
You can also customize learner-facing areas such as dashboards, progress displays, and user profile sections — all within the drag-and-drop builder interface. These integrations are especially useful on established websites, where you may want LearnDash to blend seamlessly into your existing design system rather than standing out as a bolt-on LMS.
Tip: With either of these page builders, you can create a completely custom learner interface that matches your brand — without relying on Focus Mode or switching to a LearnDash-recommended theme.
Customizing LearnDash Visual Settings
Once your theme is in place, the next step is to customize the core visual settings provided by LearnDash itself. These settings allow you to apply your brand identity across your LMS environment — regardless of whether you’re using Focus Mode.
What You Can Customize in LearnDash LMS > Settings:
- Logo – Upload a custom logo specifically for your LMS. This logo appears on LearnDash templates like Focus Mode and some user dashboards.
- Colour Scheme – Define accent and progress bar colours to align with your brand.
- Focus Mode – Enable or disable LearnDash’s full-screen, distraction-free learning layout.
- Header/Footer Visibility (Focus Mode) – When Focus Mode is turned on, you can choose whether to show or hide your site’s header and footer.
These settings give your LMS a consistent, professional look that’s separate from your WordPress theme’s general styling — helping you brand the learning experience independently from the rest of your site.
What is ‘Focus Mode”?
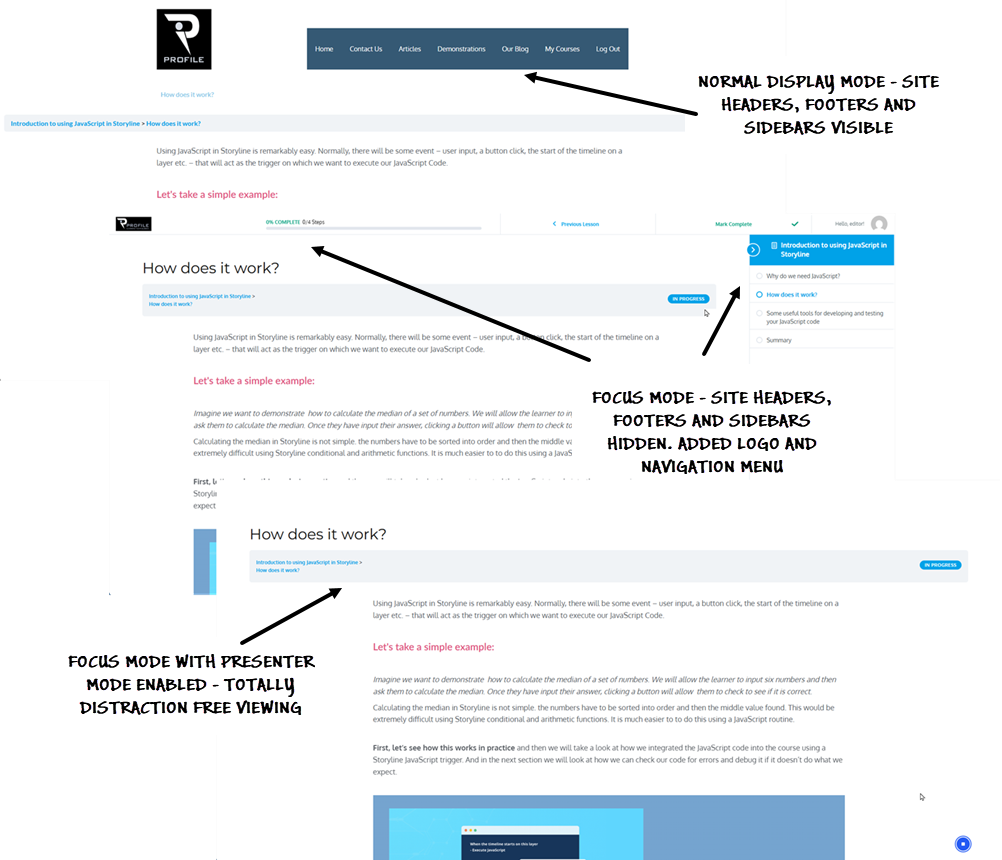
While the LearnDash settings allow for branding and colour customization across the LMS, Focus Mode specifically changes the layout and user experience during course participation. It offers:
- Distraction-free layout – Automatically hides sidebars, footers, and headers that may be present in your WordPress theme.
- Simplified navigation – Adds a clean left-hand sidebar with progress tracking and quick links to lessons, topics, and quizzes.
- Responsive design – Optimized for mobile and tablet learning with a single-column layout.
- Full-width content area – Ensures learners stay focused on the material, not your site’s general interface.
If your WordPress theme already uses full-width templates with no sidebar or footer clutter, the difference when using Focus Mode may be subtle — but it still offers a consistent, learner-optimized layout across all devices.
Note: Typography and layout elements like fonts, spacing, and button styles are still controlled by your WordPress theme or page builder (e.g., Astra, Kadence, Elementor).
Presenter Mode (for Even Greater Focus)
In addition to Focus Mode, LearnDash now offers Presenter Mode — an optional setting that allows learners to view course content in an even more focused display. When enabled, it minimizes interface elements further and is especially useful when learners are following along with a live instructor or presentation.

For solo learners, it can also help reduce distractions by displaying only the content itself — removing menus, progress bars, or user interface elements that might otherwise compete for attention.
Focus Mode vs. Presenter Mode (At a Glance)
| Feature | Focus Mode | Presenter Mode |
| Learner-facing distraction-free layout | Yes | Yes, with even fewer UI elements |
| Sidebar with navigation | Present | Typically hidden |
| Progress tracking display | Visible | Hidden or minimized |
| Instructor use (e.g. projecting content) | Not ideal | Optimized for display/sharing |
| Best for | Self-paced learners | Maximum visual focus |
Branding Your LMS (Colours, Fonts, and Logo)
Once your theme and layout are in place, it’s time to apply your brand identity to your LearnDash platform. This includes setting your colour palette, selecting typography, and ensuring your visual elements are consistent across both desktop and mobile experiences.
Colours and Accent Styles
As we have already seen, LearnDash allows you to define accent colours for key visual elements such as progress bars, buttons, and Focus Mode backgrounds directly within its settings (LearnDash > Settings). These colours apply specifically to LearnDash templates and features — giving you a simple way to inject your brand’s colour palette into the course experience.
However, for full visual consistency across your entire site — including navigation menus, headings, footer areas, and non-LearnDash pages — you’ll need to adjust your global theme colour settings. This is done through the WordPress Customizer (Appearance > Customize), where most modern themes like Astra, Kadence, or BuddyBoss allow you to define:
- Primary and secondary colours
- Link and button hover states
- Backgrounds and text colours
Aligning your LearnDash accent colours with your site’s global palette ensures learners experience a cohesive, branded environment from the moment they land on your site to the point they complete a course.
Tip: Stick to 2–3 primary colours and use them consistently across all LearnDash elements. This helps maintain a professional feel while avoiding visual overload.
Fonts and Typography
Fonts aren’t controlled directly by LearnDash — they’re handled by your WordPress theme or your page builder (like Elementor or Beaver Builder). Choose consistent, accessible fonts for headings, body text, and buttons.
To ensure visual consistency:
- Use your theme’s Typography settings to define font families and sizes.
- Or set global fonts via your builder’s style panel.
- Apply the same font choices across course materials, titles, buttons, and navigation to strengthen branding and readability.
Tip: Keep your font choices legible across all devices. Avoid novelty fonts or overly light styles, and maintain strong contrast between text and background for maximum clarity.
Logos and Icons
If you’re using Focus Mode, LearnDash lets you upload a separate logo (via LearnDash > Settings > Focus Mode) that appears specifically in the learning interface. This is a great way to reinforce your brand without affecting your main site’s logo.
If you’re not using Focus Mode, your global site logo will still appear on LearnDash pages unless you’ve customized the template using your theme or builder.
In conclusion
Customizing the visual design of your LearnDash LMS is about more than just appearance — it’s about crafting a user experience that’s branded, intuitive, and learner-focused. Establishing a consistent visual identity across your LearnDash platform helps create a seamless, trustworthy learning experience — especially when your LMS sits within a broader website.
By carefully choosing your theme, applying your brand’s colours and fonts, and integrating the right page builder tools, you can ensure that your learning environment looks and feels as professional as the content it delivers.
In the next article, we’ll explore how to build engaging learning content within LearnDash — including lessons, topics, quizzes, video, downloadable materials, and even interactive tools like H5P or Storyline. This is where the real teaching happens, and where good structure meets great substance.
If you want to know more about how to go about installing LearnDash on your own website we are always happy to help – asking our advice is free! Only getting us to do it for you is chargeable.
Affiliate agreements
Please feel free to share this article and don’t forget to follow our company page on LinkedIn for news of further articles or free courses on this site by using the link opposite.

